Difference between revisions of "DS18B20"
(Add schematic) |
(→Resources: add waveshare link) |
||
| (13 intermediate revisions by the same user not shown) | |||
| Line 1: | Line 1: | ||
| − | {{Blockquote|DS18B20}} | + | {{Blockquote|The DS18B20 digital thermometer provides 9-bit to 12-bit |
| + | Celsius temperature measurements and has an alarm | ||
| + | function with nonvolatile user-programmable upper and | ||
| + | lower trigger points.}} | ||
=DS18B20= | =DS18B20= | ||
==Pinout== | ==Pinout== | ||
[[File:Ds18b20-pinout.jpg|200px]] [http://www.hobbytronics.co.uk/ds18b20-arduino DS18B20 Image found here] | [[File:Ds18b20-pinout.jpg|200px]] [http://www.hobbytronics.co.uk/ds18b20-arduino DS18B20 Image found here] | ||
| − | |||
==Resources== | ==Resources== | ||
| − | + | ===[[:File:DS18B20.pdf|DS18B20]] data sheet=== | |
| + | ===[https://en.wikipedia.org/wiki/1-Wire 1-Wire] at wikipedia.=== | ||
| + | ===[https://www.maximintegrated.com/en/app-notes/index.mvp/id/148 Guidelines for Reliable Long Line 1-Wire Networks] at Maxim=== | ||
| + | ===[http://www.waveshare.com/wiki/Raspberry_Pi_Tutorial_Series:_1-Wire_DS18B20_Sensor Raspberry Pi Tutorial Series: 1-Wire DS18B20 Sensor]=== | ||
| + | |||
| + | ===Notes from the field=== | ||
| + | When I added a DS18B20 on about 75 feet of Cat 5e I changed out the pullup resistor from 4.7k to a 1k. I put signal and ground in one pair, and power on a single wire of another pair. | ||
==Raspberry Pi== | ==Raspberry Pi== | ||
| + | ===Schematic=== | ||
| + | [[File:Rpi2-DS18B20.png|600px]] | ||
| + | ===Code=== | ||
| + | ====RPi.GPIO version==== | ||
| + | <source lang="bash"> | ||
| + | python | ||
| + | import RPi.GPIO as GPIO | ||
| + | GPIO.VERSION | ||
| − | <source lang=" | + | root@rpi2:~# python |
| + | Python 2.7.3 (default, Jun 22 2016, 03:14:32) | ||
| + | [GCC 4.6.3] on linux2 | ||
| + | Type "help", "copyright", "credits" or "license" for more information. | ||
| + | >>> import RPi.GPIO as GPIO | ||
| + | >>> GPIO.VERSION | ||
| + | '0.6.2' | ||
| + | >>> | ||
| + | </source> | ||
| + | |||
| + | ====Setup 1 wire==== | ||
| + | <source lang="bash"> | ||
# add this line to /boot/config.txt | # add this line to /boot/config.txt | ||
dtoverlay=w1-gpio | dtoverlay=w1-gpio | ||
| Line 16: | Line 43: | ||
modprobe w1-gpio | modprobe w1-gpio | ||
modprobe w1-therm | modprobe w1-therm | ||
| + | lsmod | grep w1 | ||
# device directory | # device directory | ||
| Line 22: | Line 50: | ||
# cd to your unique DS18B20 identifier | # cd to your unique DS18B20 identifier | ||
cat w1_slave | cat w1_slave | ||
| + | </source> | ||
| + | |||
| + | ====Read and display==== | ||
| + | <source lang="python"> | ||
| + | |||
| + | #!/usr/bin/env python | ||
| + | |||
| + | import time | ||
| + | import os | ||
| + | |||
| + | os.system("/sbin/modprobe w1-gpio") | ||
| + | os.system("/sbin/modprobe w1-therm") | ||
| + | |||
| + | try: | ||
| + | while True: | ||
| + | tempfile = open("/sys/bus/w1/devices/28-80000028ac7c/w1_slave") | ||
| + | thetext = tempfile.read() | ||
| + | tempfile.close() | ||
| + | tempdata = thetext.split("\n")[1].split(" ")[9] | ||
| + | temperature = float(tempdata[2:]) | ||
| + | temperature = 9.0 / 5.0 * (temperature / 1000) + 32 | ||
| + | print temperature | ||
| + | |||
| + | time.sleep(1) | ||
| + | except KeyboardInterrupt: | ||
| + | pass | ||
| + | |||
</source> | </source> | ||
===Resources=== | ===Resources=== | ||
| − | + | ====[http://www.raspberrypi-spy.co.uk/2012/06/simple-guide-to-the-rpi-gpio-header-and-pins/ Simple Guide to the RPi GPIO Header and Pins]==== | |
| − | |||
==BBB== | ==BBB== | ||
| Line 32: | Line 86: | ||
==Arduino== | ==Arduino== | ||
===Resources=== | ===Resources=== | ||
| − | + | ====[https://arduino-info.wikispaces.com/Brick-Temperature-DS18B20 Brick-Temperature-DS18B20]==== | |
Latest revision as of 17:46, 7 May 2017
The DS18B20 digital thermometer provides 9-bit to 12-bit Celsius temperature measurements and has an alarm function with nonvolatile user-programmable upper and lower trigger points.
DS18B20
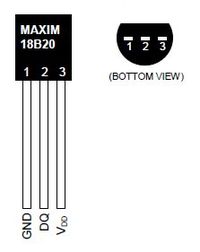
Pinout
Resources
DS18B20 data sheet
1-Wire at wikipedia.
Guidelines for Reliable Long Line 1-Wire Networks at Maxim
Raspberry Pi Tutorial Series: 1-Wire DS18B20 Sensor
Notes from the field
When I added a DS18B20 on about 75 feet of Cat 5e I changed out the pullup resistor from 4.7k to a 1k. I put signal and ground in one pair, and power on a single wire of another pair.
Raspberry Pi
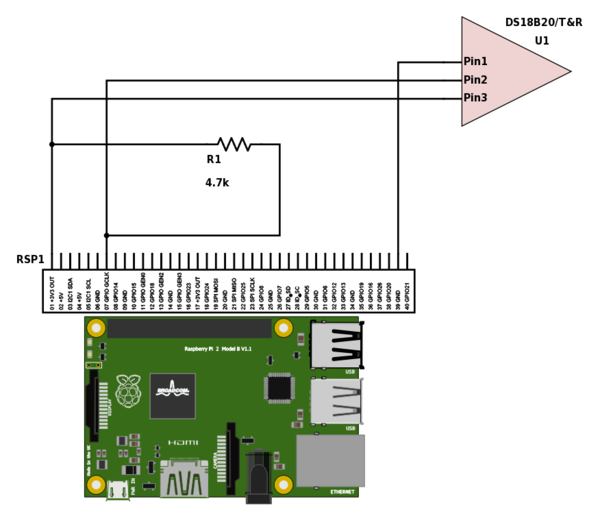
Schematic
Code
RPi.GPIO version
python
import RPi.GPIO as GPIO
GPIO.VERSION

root@rpi2:~# python
Python 2.7.3 (default, Jun 22 2016, 03:14:32)
[GCC 4.6.3] on linux2
Type "help", "copyright", "credits" or "license" for more information.
>>> import RPi.GPIO as GPIO
>>> GPIO.VERSION
'0.6.2'
>>>
Setup 1 wire
# add this line to /boot/config.txt
dtoverlay=w1-gpio

modprobe w1-gpio
modprobe w1-therm
lsmod | grep w1

# device directory
cd /sys/bus/w1/devices
ls -l
# cd to your unique DS18B20 identifier
cat w1_slave
Read and display
#!/usr/bin/env python

import time
import os

os.system("/sbin/modprobe w1-gpio")
os.system("/sbin/modprobe w1-therm")

try:
        while True:
                tempfile = open("/sys/bus/w1/devices/28-80000028ac7c/w1_slave")
                thetext = tempfile.read()
                tempfile.close()
                tempdata = thetext.split("\n")[1].split(" ")[9]
                temperature = float(tempdata[2:])
                temperature = 9.0 / 5.0 * (temperature / 1000) + 32
                print temperature

                time.sleep(1)
except KeyboardInterrupt:
        pass

